How to generate an image with Candy AI(and turn it into a video)
Step-by-step guide to generating an image with Candy AI then turning it into a video in one click. Screenshots, tokens, official prompts. Tested April 2026.
Demo — what you'll learn to do: generate an image with Candy AI, then turn it into a 4K AI-animated video. Full step-by-step below.

- Step 1 — Image: pick a character → style → prompt → generate (4 tokens V2, 2 tokens V1)
- Step 2 — Video: on your generated image, click "Create AI Video" — Candy auto-animates in ~30s
- Official prerequisite: no video "from scratch" on Candy. You must have an image first. (official source)
- Good to know: V2 image engine (better quality) and Lumina-Realism V4 video engine (4K clips ~15s, locked facial structure for consistency)
For the full verdict on Candy AI, see our detailed review.
Let’s be honest — generating images or videos on most AI sites is rarely a smooth ride. You get tangled in positive prompts, negative prompts, weight tags… And then the artifacts: an 11-fingered hand, a foot that vanishes into thin air, eyes pointing in different directions.
Candy AI takes a different approach. There’s a clean framework that handles the heavy lifting, but it still leaves room for your imagination. In this guide, we walk you through their model — how to generate the image, then how to turn that image into a video of your future AI companion.
Cost: a quick read of this tutorial, and a handful of Candy tokens. ^^
How do you generate an image with Candy AI?
To generate an image with Candy AI: log in, click Generate in the left menu, choose your character, pick a preset style (clothing / poses / scene), write your prompt, then click Image Generator (cost: 4 tokens on V2). The image appears in about 10 seconds. To turn it into a video, click Create AI Video on the generated image.
Step-by-step with screenshots below.
Before you start: what you need
- A Candy AI account (the free account is enough for 1 demo image)
- Tokens: 2 tokens for a V1 image, 4 tokens for a V2 image (better quality)
- A bit of patience: ~10 seconds for an image, ~30 seconds for a video
- Important: Candy does not generate videos from scratch. You need to create an image first, then convert it. (official source)
No tokens? The standard Premium plan ($12.99/month) includes 100 monthly tokens. One-off bundles start at $9.99. (official details)
Step 0 — Access the image generator
Once logged in, the generator isn’t on the home page. You have to find it in the left menu.
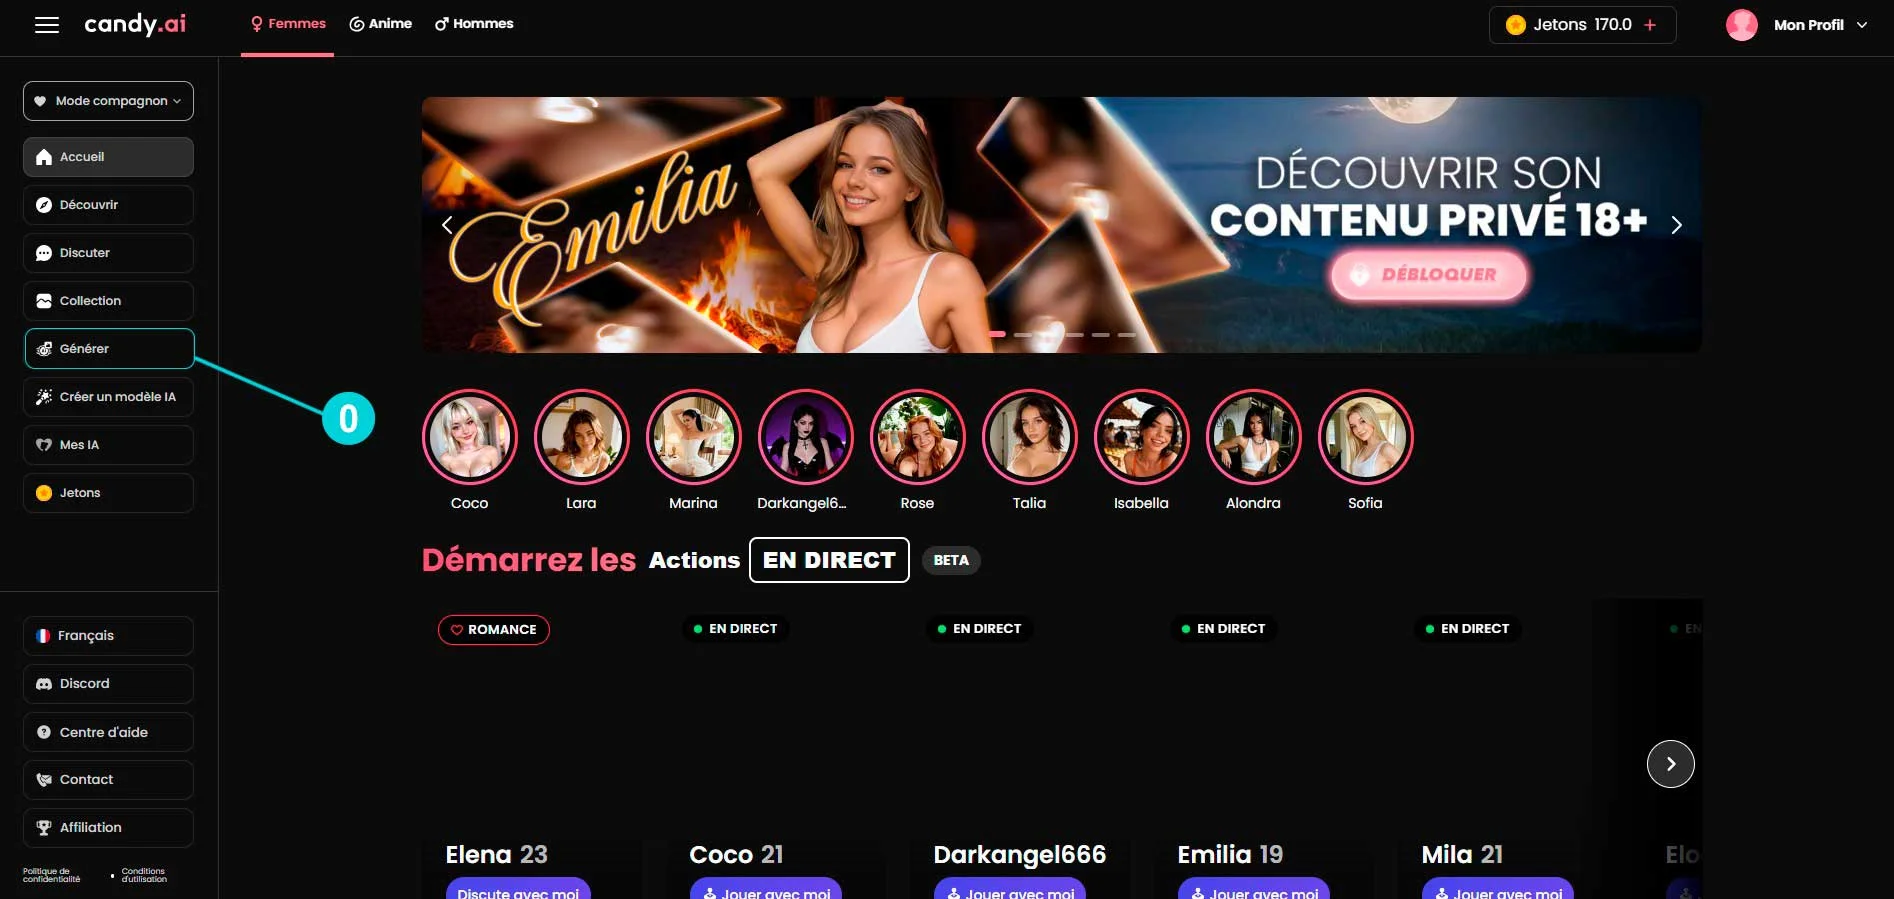
Click “Generate” in the left sidebar (between “Collection” and “Create AI Model”).
Step 1 — Set up your image
Welcome to the Image Generator page. Everything happens on a single screen — no need to navigate between multiple pages.
You have 4 zones to set up, in order:
1️⃣ Pick your character

Click the character icon in the top left to open your AI list. You can choose from the available ones or use one you created yourself via “Create AI Model”.
Tip: if your character displays a V2 badge, you’re using the latest engine (better skin textures, lighting, poses). That’s what we recommend.
2️⃣ Pick a preset style
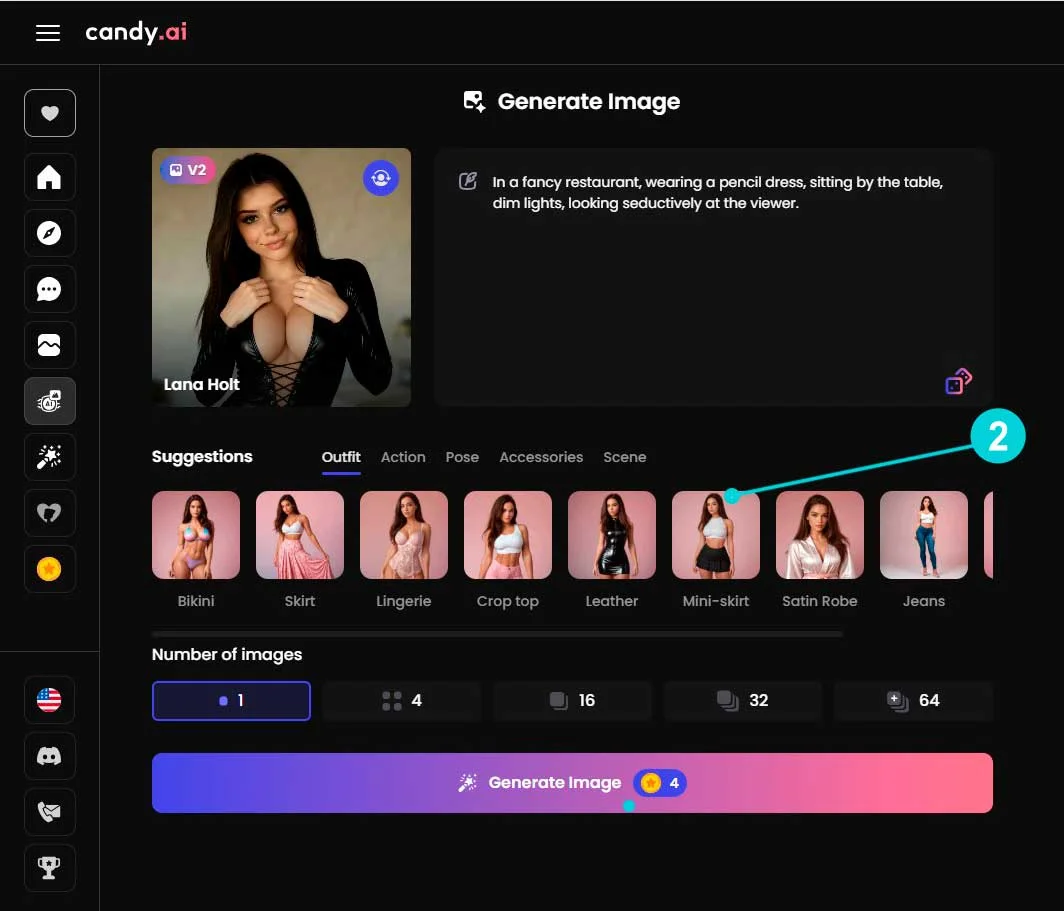
Below, you’ll find tabs: Clothing / Actions / Poses / Accessories / Scenes.
No need to write “black leather dress, standing in front of a bed” word for word — one click on Leather in Clothing does it for you. Ideal if you’re just starting out.
3️⃣ Write your prompt (or complete it)
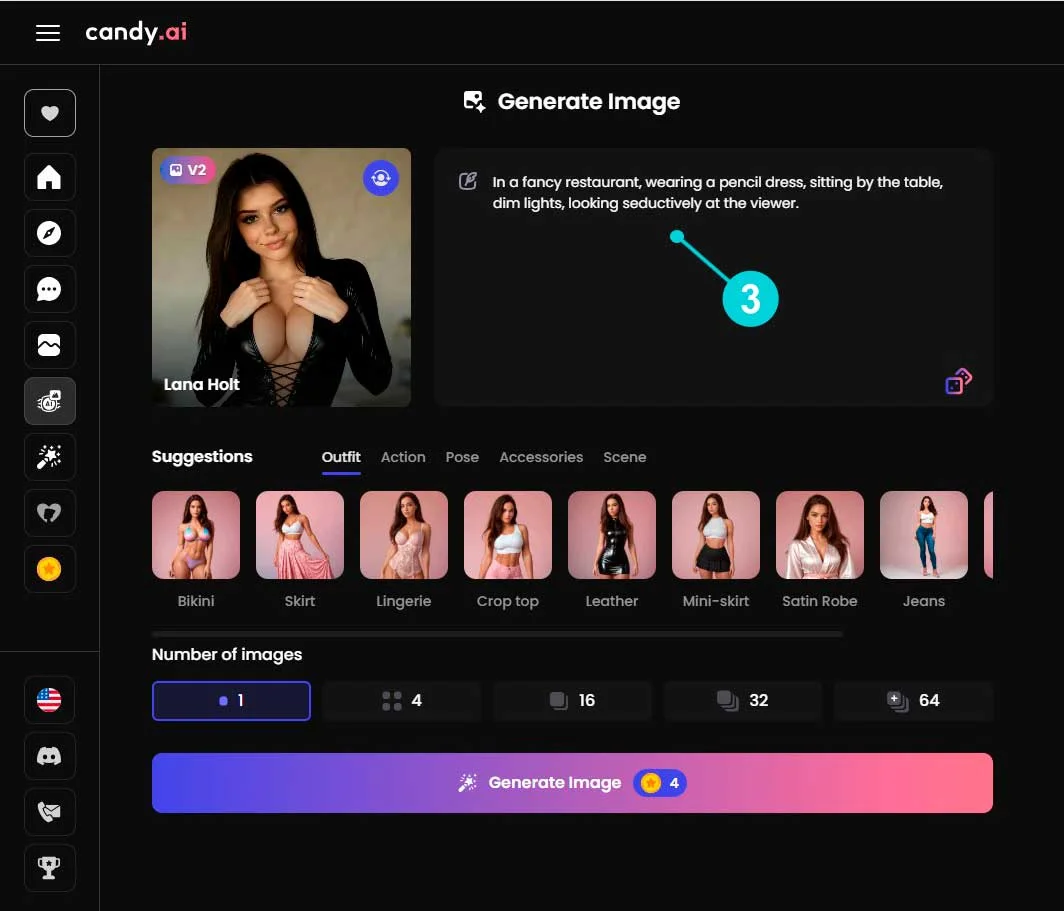
The right zone is editable. Either start from a preset and enrich it, or write everything by hand.
Official Candy tip: describe the full scene, not just the subject. Example recommended in their Help Center: “I need an image where you are seated on your couch watching Netflix”. (official source)
Prompts work well overall. There’s an option to let the AI handle the prompt for you — handy when you’re stuck on phrasing. Just watch out for lying-down poses, which sometimes produce small anatomical inconsistencies…
4️⃣ Hit generate
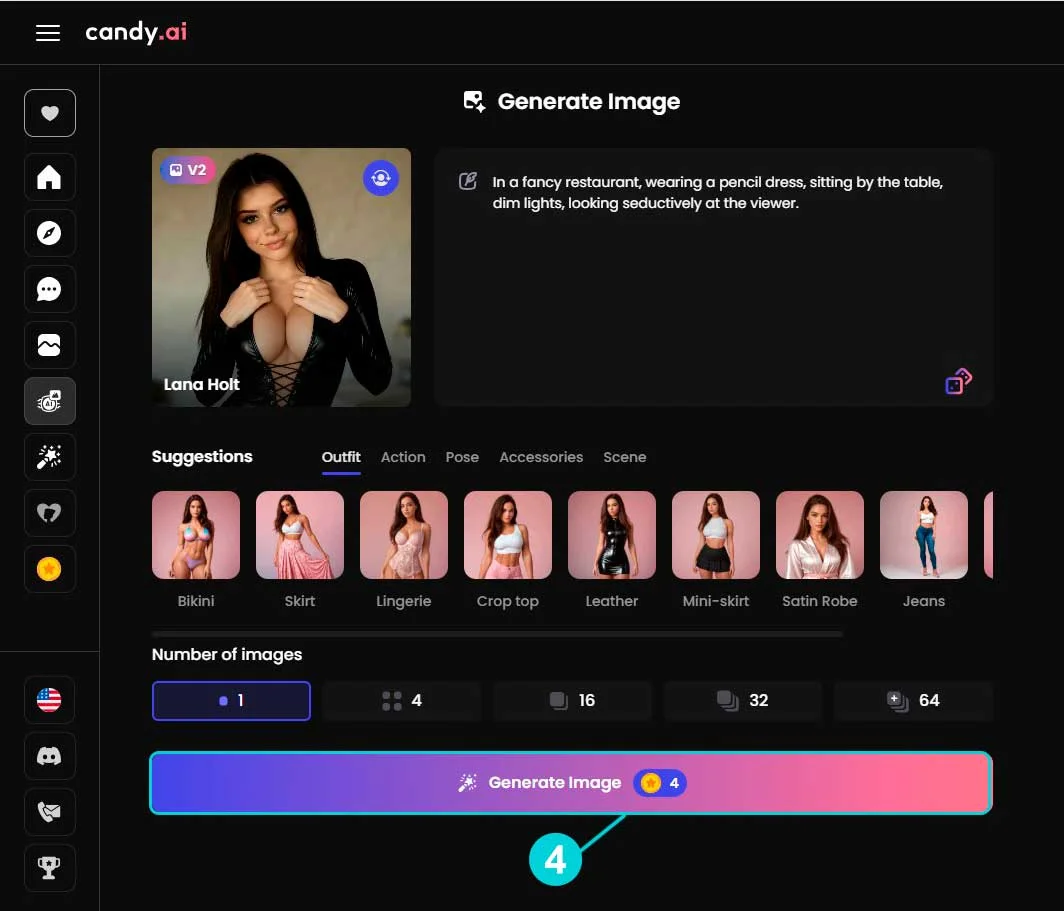
At the bottom, the big gradient button Image Generator ⭐4.
The ⭐4 tells you how many tokens it will cost (4 here on V2, would be 2 on V1).
You can generate up to 64 images at once if you want variations. 16 images come out in ~16 seconds. Multiply the token cost by the number of images.
Step 2 — During generation
Count ~10 seconds for 1 image on V2. That’s how long Candy’s inference engine takes to iterate.
Step 3 — Your image is ready
Happy with the result? Move on to the next step. If not, you can regenerate (costs more tokens) or tweak the prompt.
It works well — really well. Out of 8 generations, only 1 artifact on a tricky pose. For the purposes of this tutorial she keeps her dress on — my imagination stops where Google’s policy starts. ^^
Step 4 — Turn your image into a video
This is where Candy AI stands out. In 1 click, any generated image becomes an animated video — exactly the result you saw in the demo at the top of this tutorial.
On your generated image (previous screenshot), look at the top left: the “Create AI Video” button. Click it. That’s it — no prompt to rewrite, no parameter to adjust, the AI decides the animation on its own. Count ~30 seconds of generation.
Under the hood: since February 2026, Candy uses the Lumina-Realism V4 engine. 4K clips, 5 or 10 seconds long (10s = max), and most importantly — the facial structure is locked: your character stays identical between image and video.
The video in 1 click is smooth, it’s clean. On a subscription, the quality is genuinely solid for the price. We’re not in the trash territory of Promptchan, and that’s not the goal — but you don’t have to spend hours fiddling with prompts to get something pretty. Kudos to Candy.
Token cost recap
| Action | Token cost | Generation time |
|---|---|---|
| V1 image engine | 2 | ~10s |
| V2 image engine (recommended) | 4 | ~10s |
| Batch 16 V2 images | 64 | ~16s |
| 5-second video | 12 | ~30s |
| 10-second video (max length) | 20 | ~30-60s |
| Premium standard plan | 100 tokens / month included ($12.99) | — |
Common mistakes to avoid
Not many real mistakes possible with Candy, but a few traps to dodge:
- Trying to generate a video from scratch — impossible on Candy. You must create an image first, then click “Create AI Video” on that image.
- Overloading the prompt — contradictory details cascading on each other = artifacts. Stay sober, the AI handles the rest.
- Lying-down poses — that’s where you’ll see the most anatomical inconsistencies. If possible, go for standing, sitting, or semi-reclined.
- Regenerating in a loop instead of tweaking the prompt — every generation costs your tokens. Better to refine the wording than burn through rerolls.
Going further
— Our full review of Candy AI — verdict, pricing, alternatives
— How to create your own Candy AI character
— Candy AI prompts that actually work
— Candy AI vs Joi: which one to pick?
Official sources cited
Technical data and tips used in this tutorial, verified on the official Candy AI Help Center:
- AI Video Generation — can you make videos without an image?
- How to get the best possible results when generating images
- What can I do as a free user
- What can I do with tokens
→ Our full review of Candy AI
→ All our Candy AI tutorials
→ Best AI Girlfriend comparison 2026